Data Type
In the previous blog we already introduced System Verilog, so let’s start this with some more interesting basic terms, i.e., data types.
SystemVerilog provides a wide range of integer and real data types, as well as nets.
Verilog used to have “reg” and “wire,” but they were insufficient for functional verification.
SystemVerilog additionally has an object-oriented feature set that enables a modular and reusable verification environment. Many of the data types have been designed to enable these new functionalities.
The “integer” data type, the “real” data type, and nets are the basic categories under which data types can be roughly characterised.
When we wish to define a new data type in SystemVerilog, we use typedefs. This strategy is fairly similar to the one employed in other programming languages such as C or C++.
Enumerated types are the most widely used custom types in SystemVerilog. These provide us a way to create a totally new type with custom values. Enumerated types are created in SystemVerilog using the enum keyword.
Typedef
“typedef” simply indicates that a type name may be specified so that the same type can be used in several locations.
In our SystemVerlog code, we utilise the typedef keyword to define a new data type.
Most of the time, we just use a typedef to give a name to a type declaration that we wish to utilise in various locations across our code.
This is helpful since SystemVerilog allows us to define pretty complicated data types. We make our code easier to comprehend and maintain by using a typedef instead of duplicating a complicated type definition.
The code sample below demonstrates the common syntax we use in SystemVerilog to build data types with typedef.
typedef <base_type> <size> <type_name>;
The <base type> field is used in this construct to define what type of data we are utilising as a starting point for our new type.
In this field, we often use one of the native SystemVerilog data types, such as integer or logic.
The <size> field specifies the number of bits in our new type. This field follows the same format as explained in the section on SystemVerilog data types. If the <size> field is not required, we may remove it from our declaration.
Lastly, we utilise the <type_name> field to provide our new type with a unique name.
Consider a simple example to better show how we utilise typedef in SystemVerilog.
Assume we wanted to develop an 8-bit wide logic type to use in our code for this example.The SystemVerilog code below explains how we would use a typedef to declare this new data type.
typedef logic [7:0] logic8;
This example demonstrates how we established a new type that is comparable to an 8-bit logic type.After we’ve built a new data type, we can use it to declare variables just like any other SystemVerilog data type.
The SystemVerilog code below demonstrates how to declare a variable that utilises the logic8 data type we defined with a typedef.
logic8 example;
logic [7:0] example; //both are equivalent
Typedef in Array
In SystemVerilog, the typedef keyword may also be used to define custom array types.
We add an extra field at the end of the declaration when we wish to utilise an array as part of a typedef.This additional field is used to define the number of elements in our array.
The SystemVerilog code below demonstrates the general syntax for declaring an array type using the typedef keyword.
typedef <base_type> <size> <type_name> <elements>;
The <elements> field is used in this construct to define how many elements are in our array.
Let’s look at a simple example to see how we can use typedef to generate custom array types.For this example, assume we wanted to make an array with four 8-bit logic vector elements.
The SystemVerilog code below demonstrates how to construct this custom array using typedef.
typedef logic [7:0] logic8_array [4];
typedef logic [7:0] logic8_array [3:0];				//alternative way to define
To assign data to the new data type, we can use array literals. Alternatively, we may use square brackets to access specific elements of the variable.
The sequence below illustrates how to define a variable that utilises our custom array type and how to assign data to the variable using array literals and square brackets.
logic8_array example;						//Variable declaration
example = '{ 8'h01, 8'h02, 8'h03, 8'h04 };			//assign data
example[0] = 8'h01;						//assign data to variable
example[1] = 8'h02;
example[2] = 8'h03;
example[3] = 8'h04;
event control
The @ event control may detect any change in a variable or net.
The event control is triggered when any bit of a multi-bit variable changes. SystemVerilog extends the @ event control with an iff qualifier.
In the following example, the always block will be run if a variable’s value changes within the always block.
module event_ctrl;
  bit [2:0] a,b;
  always @(*)			//always block is executed at every changing value of a and b
  begin
    $display($time,"\tValue of a=%0d, b=%0d",a,b);
  end

  initial begin
    #2 a=5;
    #3 b=2;
    #2 a=1;
    #1 b=7;
    #2;
    $finish;
  end
endmodule
Figure 2 shown below is the output of the above example of event control.
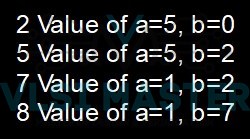
Fig 2: Event Control output
enum
To build an enumerated type in SystemVerilog, we use the enum keyword.
This implies that the type we build will have a list of valid values from which to choose. When we build the type, we clearly state the valid values that it can accept.
The enum types are commonly used in SystemVerilog to encode the states of a finite state system. The code sample below demonstrates the typical syntax for creating an enumerated type.
enum { <values> } <variable_name>;
The field is used in this construct to define the list of values that the type can accept. This field contains a comma-separated list of strings.We can only assign an enumerated type to one of the values specified in the field after we’ve created it.
When we run a simulation, we will get either a compilation error or a warning if we try to assign the type to any value that isn’t explicitly stated in the field. The precise behaviour of this failure is determined by the instruments we utilise.
When we declare an enum type in this manner, we also establish a variable that may be used in code.
typedef enum { <values> } <type_name>;
In this construct, we use the <type name> field to provide our new type with a unique name.
After we’ve generated a new data type in this manner, we can use it to declare variables just like we would with existing SystemVerilog data types.
Consider a simple example to better show how we utilise the enum keyword in SystemVerilog.
Assume we wish to develop an enumerated type to be utilised in a state machine in this example.The state machine has three states that we must include in our enum type: idle, reading, and writing.
The SystemVerilog code below explains how to use enum to build this enumerated type.
enum { EATING, WALKING, RUNNING } example_state;
Notice how the enumerated states are all in capital letters in this code line. This is because SystemVerilog regards each of the specified values as a constant. As with other programming languages, capital letters are commonly used for constants.
Defining enum value
When we define an enum in SystemVerilog, we are essentially defining a collection of labels for an underlying int.
In reality, it is useful to see an enum type as a collection of linked constants. The actual value associated with the enumerated item will be an int by default. The underlying int’s value is determined by the order of the values in our list.
The first element in our enum will be set to zero, whereas the second entry will be set to one. As a result, the value associated with the nth element in the list of enum values is n-1.
Consider the basic source code below as an example.
enum { TEST0, TEST1, TEST2, TEST3 } example;
The TEST0 constant is the first in the list in this code example, whereas the TEST3 constant is the fourth. As a consequence, the TEST0 constant is identical to an int with the value 0 and the TEST3 constant is comparable to 3.
However, there may be times when we need to assign various values to the constants in our enum. When we need to do this, we simply use an equal symbol to describe the value we wish to associate with a constant.
The code sample below demonstrates the typical syntax used to associate a specific value with an enumerated type constant.
enum { <name>=<value> } <variable_name>;
In this example, we supply the name of the enum constant using the <name> field. The <value> field is then used to assign a value to this constant.
As a result, instead of the default values, we want to connect the constants with the numbers 1, 2, 4, and 8. The example below demonstrates how we might accomplish this with SystemVerilog.
enum { STARTING=1, UPDATING=2, RUNNING=4, ERROR=8 } example;
It is quite simple to correlate values with constants in an enum type as shown in the above example.
enum Methods
Once we construct an enumerated type in SystemVerilog, we are immediately assigned a set of methods. The table below lists the many methods that may be used with enum types in SystemVerilog.
| Method | Description |
| prev | The next constant in the enumerated type is returned. |
| next | The previous constant in the enumerated type is returned. |
| first | The first constant in the enumerated type is returned. |
| last | The last constant in the enumerated types is returned. |
| name | The name of the current element in the enumerated type is returned. |
prev() and next() Methods
We can see from this list that the next and previous methods may be used to travel between the constants in the enumerated type. The prev and next functions, by default, return the next or previous constant in the enumerated list.
Therefore, more than one entry in the enum can be used to jump ahead or backwards.
For example, if we wanted to go through three members of an enumerated type, we would supply three to the method when we called it.
The code shown below will illustrate all the basics and can be simulated online.
previous1 = example_enum.prev();
next1 = example_enum.next();
first() and last() Methods
The first and last methods may be used to return the first and last constants in our enum type. As we can see, these techniques’ behaviour is self-explanatory.
The code shown below will illustrate all the basics and can be simulated online.
first = example_enum.first();
last = example_enum.last();
name() Method
The name method is the final method that may be used with enum types. Again, this method’s behaviour is self-explanatory. This function is used to return the name of an enumerated constant that is presently allocated to a variable.
The code shown below will illustrate all the basics and can be simulated online.
name = example_enum.name();
From today’s blog we learned some basic data types of the system Verilog, and more is to be explained in further blogs. So let’s summarise the whole blog in a few questions so that it will be remembered well.
- What exactly do you mean by data type?
- What is the function of Typedef?
- What is the syntax for using Typedef in an array?
- Why is eventcontrol utilised in system verilog?
- What exactly is an enum, and why is it used?
- What is an enum value?
- Describe the enum Methods.